Friday, March 16, 2012

Spring Cards with Watercolor Pencils

Lately, I have been playing with my set of Caran D'Ache watercolor pencils. I love my Copics, but I find they are not very portable (because I have lots of wonderful colors) and these days I spend more time driving my kids around than I do at home! So I thought I'd try to color my favorite stamped images with colored pencils instead of my copics.

I started with a simple graded wash over Tim Holtz backwards script...


Then I wanted to try some new shading techniques. I actually used the same blue to color the flower as I used for the shadows on the leaves!


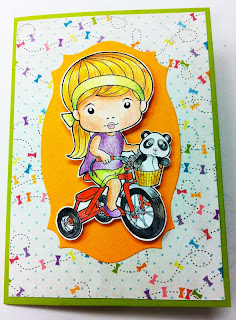
Then I decided to play with Tricycle Marci. I used many of the same techniques to color her in watercolor as I do with my copics. I chose my main color, then used lighter and darker versions of that color. I also tried other techniques, like shading with analogous colors (e.g.-violet to shade the red trike).


I will be teaching these techniques and more at Memories Live On in Cupertino on April 15th at 2 pm. Hope to see you there!



Chocolate Box Album

Around Valentine's Day, it's very hard not to think about chocolate - actually, that's true any day! So when I walked into my LSS and saw the Best Creations Candy Shop 6 x 6 paper pad, I couldn't resist!! I knew that I had to make something fun with all of those goodies... a chocolate box album!

Of course, on Valentine's Day, my sweet husband gave me a beautiful box of chocolates. Their yummy goodness, and the box, inspired me to make the cover of my chocolate album...


I used my Silhouette Cameo to cut out the chocolates and decorated them with Perfect Pearls "icing".


The donut is cut with the Silhouette. I decorated the frosting with Perfect Pearl "sprinkles". The donut frame lifts off of the doily with a hinge.


Thursday, January 19, 2012

Spring Cards at Memories Live On

Just before Thanksgiving, I took a class on Prismacolor pencil coloring. I was hooked! Now I finally got a chance to share some of my new ideas...

Here is a fun card that I made using the Basic Grey Picadilly line and My Favorite Things Dip Me in Chocolate stamp.


To add to the fun, I used a butterfly laser cut paper to make a stencil for Chalkboard spray mists. Then I layered Tim Holtz butterflies on top.


I will be teaching the techniques for both cards at Memories Live On in Cupertino on Sunday, February 5th. Also, I am working on a gift box project (worthy of filling with chocolate) to add to these two cards.

I hope you can join me!


Tuesday, December 13, 2011

Holiday Jewelry Boutique


I have been busy making jewelry for the past few months. I've been playing with a bunch of new techniques including resin clay, pmc, pourable resin, and weaving techniques with leather. Here are some of my latest creations!


I will be showing my new pieces at my Holiday Jewelry Boutique this Thursday, Friday and Saturday. I will be posting more pictures soon!

Friday, November 18, 2011

Foil Ornament Christmas Card


Here is the new card that I promised. This one has a removable Christmas ornament!

I was playing with the new Die-namics ornament dies, and I thought it would be fun to try a new technique. I covered grunge paper on both sides with foil tape and then cut out the ornaments. Then, I embossed them with a Tim Holtz damask embossing folder and colored them with alcohol inks.

To make the removable ornament, I cut out two large doilies from the Die-namic's Doily Duo and glued them back to back with a ribbon in between. I used Fired Brick Distress Ink to color grunge paper and cut the number 25 out with a TH mini Sizzix die. Then I covered the numbers with diamond glaze. To finish it off, I used gold pearl pen to decorate the doilies. I used removable adhesive to attach the ornament to the card so that it's easily removable.

I will be teaching the techniques to make this card as well as the previous two Christmas cards at Memories Live On in Cupertino on December 3. I hope you can join me!

Wednesday, November 16, 2011

Vintaj necklace with gift box & gift card

Here is a new necklace that I made using the new Vintaj brass dies and embossing folders. I added BoBunny brads and buttons for fun and color.


I made a gift box and gift card with the Authentique Gathering papers:


Enjoy!

Christmas Cards to Die(cut) for!

I went on a mini shopping spree the other day and bought some of the new Tim Holtz Christmas dies and stamps. The Graphic45 Christmas Emporium paper was called to me as well.

When I got my goodies home, I thought it would be fun to play with some of my art supplies. I came up with two cards (so far)...


I used the TH holiday lampost die and house border to set the scene. I wanted to make a snowy setting, so I painted tops of the roofs and lampost with picket fence crackle paint and then poured on the glitter before the paint dried. I also use polar white flowersoft (with glitter added, of course) for the snowy hill. I cut the snowflakes out of two layers of cardstock with a piece of wide sookwang tape on the top. Then I peeled the protective sheet off of the sticker snowflakes and dipped them in silver glitter.


For this Santa card, I used multiple layers of circles from the Spellbinders and Die-namics on top of the TH holiday embossing folder. Then I broke out my Prismacolor pencils and colored Santa's jolly face. I also used the TH festive greenery border to add the holly leaves and pine branches. I finished it off with red faux holly berries from Michaels.

I will finish more cards soon. Keep ya posted!